Integration of AWS Lambda Function with Spinnaker
Overview:
This blog post will show you how to integrate the AWS Lambda functions with Spinnaker via Clouddriver (Spinnaker microservice responsible for making API calls to AWS).
What is an AWS Lambda function?
AWS Lambda is a serverless compute service that runs your code in response to events only when needed and scales automatically, without needing you to provision or manage servers in AWS. It automatically manages operational and administrative activities for the underlying compute resources on your behalf, including provisioning capacity, monitoring fleet health, applying security patches, deploying your code, and monitoring and logging your Lambda functions.
An AWS Lambda application is a combination of Lambda functions, event sources, and other resources that work together to perform tasks. Users can use the Spinnaker UI to register a Lambda function as a target type for a target group of an Application Load Balancer (ALB)!
Lambda function plays a vital role in deployment strategies like:
- Simple deployment
- Weighted deployment
- Blue/green deployment
By using these deployment strategies we can route our traffic to new functions. So it is very helpful at the time of safe deployments.
Prerequisites:
- A running Spinnaker instance of 1.23 or later versions.
- An AWS admin accounts for AWS EC2 instance with privileges to create AWS Lambda functions.
Step 1: Configuration changes required in the AWS Console
In the AWS console, create an Execution Role ARN with admin access rights to create AWS Lambda Function.
Note: ARN (Amazon Resource Name) uniquely identifies the AWS resources. It will allow EC2 instances to call AWS services on behalf of the application in Spinnaker. Execution role ARN refers to an existing AWS IAM role, having permissions necessary for accessing AWS managed services via the deployed Lambda function.
- Create an AWS IAM role with Lambda use case along with the below-mentioned policies attached.
--SpinnakerAssumeRolePolicy--AWSLambdaFullAccess--AdministratorAccess--AWSCodeDeployRoleForLambda--AWSLambdaExecute--AWSLambdaBasicExecutionRole - On successful completion of role creation, go to that role.
You will find the Edit Trust Relationship section and find the following configuration:
{
“Version”: “2012-10-17”,
“Statement”: [
{
“Sid”: “1”,
“Effect”: “Allow”,
“Principal”: {
“Service”: “lambda.amazonaws.com”
},
“Action”: “sts:AssumeRole”
}
]
}
Edit and update the Edit Trust Relationship by adding some more fields.
{"Version": "2012-10-17","Statement": [{"Sid": "1","Effect": "Allow","Principal": {"Service": "lambda.amazonaws.com"},"Action": "sts:AssumeRole"}]},{"Sid": "2","Effect": "Allow","Principal": {"AWS": "arn:aws:iam::<<ACCOUNT-ID>>:user/<<USERNAME>>"},"Action": "sts:AssumeRole"}Here you will need to provide the Account-ID and username of the Spinnaker user.
- Try to get an Amazon SQS Dead-Letter Queue
Note: Amazon SQS (Simple Queue Service) is an AWS messaging services
-
- Go to the AWS Console and search for SQS
- Click on Create New Queue
- Enter Name: <<NameForQueue>>
- Select: Standard Queue
- Click on ConfigureQueue
- Click on Create
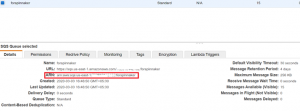
- Select the created Queue to get the “SQS ARN“

Amazon SQS Dead-Letter Queue
You have to use this ARN value while creating the new AWS Lambda function in Spinnaker.
Step 2: Configuration changes required in the Spinnaker API
Update the Spinnaker configuration using halyard to enable the AWS Lambda feature
To enable AWS Lambda function in Spinnaker, please create the file “clouddriver-local.yml” in Halyard Pod(configuration management tool for Spinnaker) under your “~/.hal/profiles” directory. Set the following configuration values to create a custom Clouddriver profile that enables AWS Lambda.
~/.hal/default/profiles/clouddriver-local.yml
aws:
features:
lambda:
enabled: true
accounts:
- name: aws-lambda #CUSTOM NAME FOR LAMBDA
lambdaEnabled: true
accountId: <<ACCOUNT-ID>> #AWS ACCOUNT ID
assumeRole: "role/<<USER-NAME>>" #AS PER YOUR IAM ROLE
Next, to enable the new functions to enable the flag-based custom feature (which remains disabled by default) in the file settings-local.js under your “.hal” config profiles directory.
~/.hal/default/profiles/settings-local.js
window.spinnakerSettings.feature.functions = true
After adding these files with proper input values, run the “hal deploy apply“ to affect the changes. Wait for the Spinnaker services to be up and running (It may take several minutes). Then navigate to the Spinnaker UI. You will find the Functions tab under the infrastructure section for an application in Spinnaker. If you don’t, refresh the browser.
Step 3: Configuration changes required in spinnaker UI
Create a new AWS Lambda function in the Spinnaker UI (Deck)
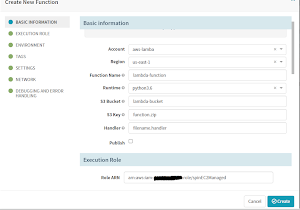
To create a new AWS Lambda function, navigate to the Functions tab under the Infrastructure section for an application in the Spinnaker and click the “Create Function” button. Fill up the “Create New Function” form with suitable values for all the form fields such as Function Name, Runtime, S3 Bucket, S3 Key, Handler, and the option to Publish as shown below:

Create New Function form for creating a new AWS Lambda Function
Note:
- S3 Bucket is the AWS S3 bucket for which we are making our function.
- S3 key is the Function-code we have uploaded to the S3 bucket in the. Zip. format.
- The Handler is the filename.handler.
We can get the value for the Role ARN field from the AWS Role Console as shown below:
In the Tags section, you can use any key and its value as a TAG parameter.

Getting the value for the Role ARN field from the AWS Role Console
Here, the Target ARN value is from the AWS SQS console ARN you had already created a few steps ago.
Or else, you can also get it from the SQS message queue details as shown below:
By clicking the Create button, you will be able to create the AWS Lambda Function in Spinnaker to access the AWS managed services.
If you want to know more about Spinnaker or request a demonstration, please book a meeting with us.
OpsMx is a leading provider of Continuous Delivery solutions that help enterprises safely deliver software at scale and without any human intervention. We help engineering teams take the risk and manual effort out of releasing innovations at the speed of modern business. For additional information, contact us.
