Deploying Windows Applications to Azure cloud using Spinnaker
Purpose
Spinnaker as a renowned Continuous Delivery tool supports app deployment into all major cloud environments including Azure cloud. Here, we guide you through the configuration and pipeline setup of a Windows application into Azure cloud using Spinnaker.
Scope
The integration steps here have been tested on Spinnaker 1.24.2. In most cases, the procedure should work for other Spinnaker versions as well; but if there is any misbehavior, let us know.
Assumptions
Note: You have configured an Azure cloud provider account. If not configured, follow the guide here to enable Spinnaker for Azure deployment.
- Valid Azure Subscription/Account Spinnaker 1.16.2
- Working Jenkins integrated with Spinnaker. Jenkins does your CI build
Our app is Windows, to be deployed into Azure cloud. These inputs are required for configuring Load Balancer and Firewall.
- – App is listening on port 8080
- – Healthcheck URL is http://localhost:8080/health
- – App URL is http://localhost:8080/greeting
Deploying Windows to Azure cloud
In order to deploy a Windows application to Azure, you should have an application entity created in Spinnaker. A firewall and a load balancer should be set up prior to configuring a deployment pipeline.
Azure and Spinnaker Resource Mapping
Spinnaker generalizes the Kubernetes cluster terms across multiple cloud. A resource in Spinnaker could mean different things in every cloud. Here is the list of resources in Spinnaker, and what they mean in Azure cloud.
|
Spinnaker Resource |
Azure cloud resource |
|
Firewall |
Network Security Group |
|
Load Balancer |
Load Balancer |
|
Server Group |
Virtual Machine ScaleSet |
Create an Application
It is mandatory to create an application to orchestrate a deployment pipeline.
To create an application, click Applications > Create Application and input the fields as shown here.
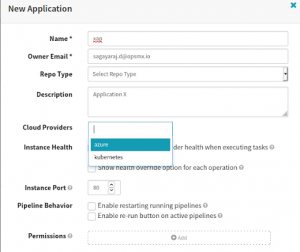
Create an Application in the Spinnaker CD pipeline
Note: When you are deploying to Azure cloud, you better keep the application name length to two or three, because the server-group configuration will take additional characters for the stack and detailed fields. A combination of all of these characters is to be a maximum of 9 characters to create a computer-name during deployment. Otherwise, the deployment will fail stating the computer-prefix is more than 9 characters.
Create a Firewall and a Load Balancer
Firewall
The Firewall you set up in Spinnaker or through Azure cloud, should be the NetworkSecurityGroup for the subnet where the VM ScaleSet (VMSS) is deployed. Otherwise, the NSG won’t be attached to VMSS by the deployment.
To attach the firewall to subnet, ensure to select virtual network and subnet fields while creating firewall in Spinnaker. See the screenshot for reference.
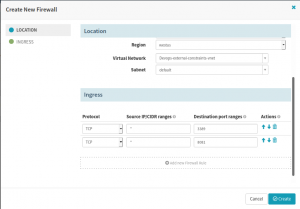
Create a Firewall in the Spinnaker CI/CD pipeline
Load Balancer
The Load Balancer exposes your application to the external public. The guide here refers to the Classic Load Balancer (works on Layer 4 of OSI model). You can also configure Application Gateway Load Balancer (works on Layer 7) which can redirect traffic based on HTTP URL path.
Create a Load Balancer with the specifications for the externally reachable protocol along with the external port of whose traffic will be forwarded to the internal VMScaleSet servers on the configured port. Health Check endpoint determines if the server is healthy or not. The healthy server will be included in the traffic pool to forward the request, otherwise, the server will not participate in serving the request.
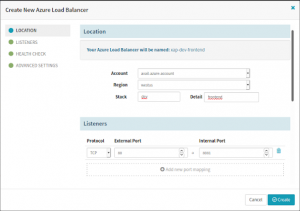
Create an Azure Load Balancer in the Spinnaker CD pipeline
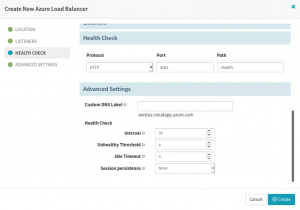
Configure Healthcheck in the Azure Load Balancer in the Spinnaker CD pipeline
Configuring a Deployment Pipeline
In the deployment pipeline, your focus is to create a machine image that will be built on top of a Base Windows machine, and then deployed with your application. Once a machine image is created, use it as a base to spin-up VMScaleSet which will be the backend for your externally exposed application.
Packer Template for Windows
Creating a machine image is driven by Hashicorp’s Packer (An opensource tool) which comes with Spinnaker out-of-the-box. Packer uses a template to generate new machine images.
Spinnaker’s Rosco is responsible for the baking process. It picks an appropriate Packer template for its file system depending on the ‘Base OS’ value selected in the Bake stage. Which Base OS uses which template is determined by the file rosco.yml
The out-of-the-box Windows template (2012r2) file, unlike other Linux images, creates the VM image in a storage account. As of writing this article, Spinnaker was not able to fetch the image information from the storage account, hence we had to disable the storage account configuration in the Packer template, this creates the image in the regular Images location. The updated template is manually overridden to Spinnaker in the Bake stage configuration as a custom template.
Configuring a Custom packer template
Ensure to write and test your custom packer template outside of Spinnaker using regular packer CLI. Once you see it is working, copy the packer <template.json> and dependency files (like pre and post installation scripts ) under hal directory:
~/.hal/default/profiles/rosco/packer/<azure-custom.json>
~/.hal/default/profiles/rosco/packer/preInstall.ps1
~/.hal/default/profiles/rosco/packer/postInstall.ps1
Login Credential for Windows VM
The baking step will configure the Image (to be generated) with a username and password from the Azure vault which is configured in the Azure account in Halyard/Clouddriver. The Secret entities in Azure Vault holding the Username and password are vmUserName and vmPassword.
You can create these entries in Azure Vault using Azure portal [or] Azure CLI
In Azure Portal: Key Vaults > Select your Vault > Secrets > Generate/Import > Input Name and Value as appropriate.
Using Azure CLI:
az keyvault secret set –vault-name <vaultname> –name vmUserName –value <username>
az keyvault secret set –vault-name <vaultname> –name vmPassword –value <password>
Note: Administrator username cannot be used as it is a reserved one.
Image Baking Step
Configure the pipeline with your Jenkins build which produces the Cholatey (.NuGet) package. Remember the Jenkins build should have a post-build archive option for Spinnaker to read the package name from Jenkins.
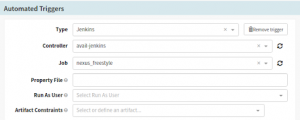
Set up Automated Triggers in the Spinnaker CI/CD pipeline
In the Bake stage, mention the Package, Base OS and region to deploy, etc. More importantly, you need to override the Template FileName field with your custom Packer template filename.
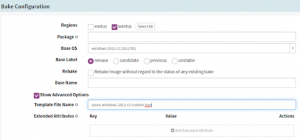
Set up Bake Stage in the Spinnaker CD pipeline
Deploying VMScaleSet Step
After the Bake stage, add a Deploy stage. Note that the name of the cluster will be used to create VM names. As of writing this article, its max character limit is nine characters. So ensure to comply with this limit. Otherwise, the deployment stage will fail on execution.
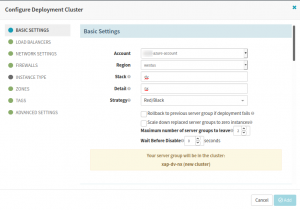
Set up Deploy Stage in the Spinnaker CD pipeline
Your deployment stage will reference the LoadBalancer and Firewall to control the traffic flow. You will also need to mention your virtual network and subnets where the deployment is going to take place.
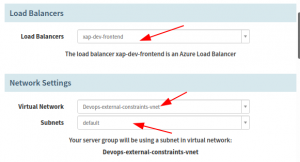
Insert your reference for load balancer, virtual network, and subnets where the deployment is going to take place.
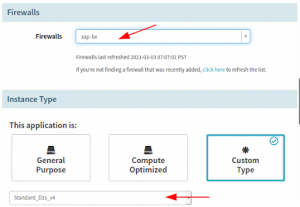
Insert your reference for firewall where the deployment is going to take place.
You will also configure the target VM machine type, zone, and custom tags if any to attach to the resources created by the Deploy stage.

Configure the target VM machine type, zone, and custom tags if any to attach to the resources created by the Deploy stage
Verification
Once the CD pipeline is configured with Bake and Deploy stages, you can run a manual execution and wait for it to complete. Upon successful completion, access the external endpoint in a browser. If you are able to access the application page successfully, it means the deployment was successful. If the page is not accessible then, debug the deployment by going through the log for the reason for failure. Logs can be seen in Spinnaker execution (Source link) and Activity Log in the Azure portal. In the Activity log, it is possible that multiple events connected with one another can be in collated form; make sure to expand the collation and check the events [make sure to check out JSON output also] to find the root cause
Summary
In this guide, you have gone through the procedure of deploying a monolithic application into the Azure cloud using the Spinnaker CD tool.
If you want to know more about Spinnaker or request a demonstration, please book a meeting with us.
OpsMx is a leading provider of Continuous Delivery solutions that help enterprises safely deliver software at scale and without any human intervention. We help engineering teams take the risk and manual effort out of releasing innovations at the speed of modern business. For additional information, contact us.
