Continuous Delivery into AWS (EC2) using Spinnaker CD Pipeline
Deploying to AWS (EC2) using Spinnaker CD pipeline, refers to the process of deploying a server group based on the Amazon Machine Image (AMI) that was created in a pre-stage ‘Bake’. During this process of continuous delivery, Spinnaker creates the EC2 instances with an existing SSH key-pair on selected subnets, associating security groups to each EC2 instance of the server-group, and hooks the server-group under a selected load balancer.
In this article, we will be covering the procedure to set up for the following:
- IAM roles needed for deployment
- Making subnets eligible for deployment
- Creating security groups for firewall control
- Creating load balancer for external traffic routing
- Configuring the deployment stage to perform deployment to AWS EC2.
Pre-Requisites
For setting up a successful Deploy stage in Spinnaker, we assume that you have the following:
- A working Spinnaker instance
- Access to the AWS console with a valid account
- Knowledge of AWS services like IAM, VPC, Subnets, EC2, AutoScaling Group, Security Groups, and Load Balancer
- Understanding of the Linux environment
Spinnaker Pipeline requires the following:
- A Spinnaker pipeline ‘Bake’ stage that creates an AMI image
Understanding the Spinnaker Deployment Pipeline Process
Remember, deployment to any cloud is governed by the Clouddriver service of Spinnaker.
To perform a successful deployment to the AWS EC2 auto-scaling-group, Spinnaker requires a baked image as part of the pipeline process. If the Bake stage is not set up in your pipeline, please refer to the article to set up a Bake AMI stage.
The deployment process will create a server-group using a given AMI on a set of availability zones in a Virtual Private Cloud (VPC) in AWS, and route the external traffic to the server-group using an existing load balancer. On creating EC2 instances, it associates an existing ssh key-pair and security group as per the configuration.
Prior to setting up a Deploy stage, you should set up the required Identity and Access Management (IAM) roles on AWS for Spinnaker to connect and deploy, and also enable the selected subnets to be visible to Spinnaker.
Steps to deploy into AWS (EC2) using Spinnaker CD Pipeline:
-
Setting up IAM Roles for the Spinnaker pipeline deployment
For Spinnaker to deploy into AWS, it requires a minimum of two IAM entities created in AWS –
- One is an IAM user to connect with an AWS Account
- The other is an IAM Role to be assumed for deployment (creating EC2 instances, AutoScaling Group, etc.)
You can have multiple AWS accounts to work with, possibly each account is purposed for different environments – like Dev, Staging, and Production. Instead of Spinnaker connecting with each AWS Account with a separate User credential, it will connect to a single account (called Primary Account) using a single IAM User (called as ManagingUser) and this user will assume a role (called as ManagedRole) that has sufficient permission in each target AWS account to perform the deployment.
The user by which Spinnaker’s Clouddriver connects to AWS using AccessKey and SecretKey is known as the ManagingAccount. Every target AWS account has a role to be assumed by the ManagingAccount to perform the deployment. The assumed role in the target AWS account is known as the Managed account. If you have 2 AWS accounts, you will end up with 2 Managed Accounts.
All of the IAM Account/Role/User procedures here are performed in AWS Web Console > Services > Under ‘Security, Identity & Compliance’ > IAM page.
Creating a Managing Account (IAM User)
No matter how many AWS accounts are targeted for deployment by Spinnaker, it just needs a single IAM user on the Primary Account in AWS to connect with.
The AWS admin sets up IAM credentials as below:
- Go to IAM in AWS Console. Users > Add User > Name ‘SpinManagingUser’. Select ‘Programmatic access’.
- Next: Tags > Have optional tags as required.
- Review and Create. Make a note of the ACCESS_KEY and SECRET_KEY.
- Next, Add a permission scope with a dedicated policy ‘SpinManagingAccountPolicy’ or with an Inline Policy to the user. The policy JSON is shown below:
{
   "Version": "2012-10-17",
   "Statement": [
      {
            "Effect": "Allow",
            "Action": [
            "ec2:Describe*"
            ],
            "Resource": [
            "*"
            ]
      },
      {
            "Action": "sts:AssumeRole",
            "Resource": [
            "arn:aws:iam::12345678:role/SpinManagedAccount"
            ],
            "Effect": "Allow"
      }
   ]
}
Note: Once you have created the managed accounts in the desired target AWS accounts, come back to the policy here and update the list of roles with ManagedAccounts under ‘Resources’ next to ‘sts:AssumeRole’.
Creating a Managed Account (IAM Role) in the target AWS Account
In every target AWS account, an IAM role is required with sufficient permission for deployment, and this role will be assumed/impersonated by the ManagingAccount on the primary AWS account to perform the deployment. The assumed/impersonated role in the target AWS account is known as the Managed account. You will end up with 2 Managed Accounts if you have 2 AWS accounts.
The AWS admin sets up IAM credentials as shown below:
- Go to IAM in AWS Console. Roles > Create Role > Choose a use case as ‘EC2’.
- Add Permissions > Select the following permissions :
- PowerUserAccess
- Next: Tags > Have optional tags as required.
- Review and Create the role as ‘‘SpinManagedAccount’’.
- Once role is created, select the same role > Add Inline Policy > JSON Editor > Add the below code: <coding here>
- Save the policy as ‘SpinManagedAccountPolicy’.
- Make a note of the Role ARN, to link in the ManagingAccount. It looks something like below:
- arn:aws:iam::12345678:role/SpinManagedAccount
- Note: If you have two target AWS accounts, you will end up with two managed accounts.
- Later, you will go back to IAM Policy ‘‘SpinManagingAccountPolicy’ and update the list of roles under Resources next to ‘sts:AssumeRole’ with this SpinManagedAccount’s ARN.
Configuring AWS ManagedAccount to trust Spinnaker ManagingAccount
Once you have the ManagedAccount role created, update its ‘Trust Relationship’ with ManagingAccount. If you have more than one ManagedAccount on different AWS accounts, perform this step on every ManagedAccount.
- Roles > Select ‘SpinManagedRole’ > ‘Trust Relationships’ tab > Click ‘Edit trust relationships’
- Replace the policy document with the following: <coding here>
- Make sure to update the policy with the ManagingAccount’s ARN.
Creating Instance Role – BaseIAMRole for Spinnaker
In every target AWS account, Spinnaker works with EC2 resources using a default role called ‘BaseIAMRole’. This role must be having an Instance Profile ARN.
If the role is not available, you can create it with or without any permission on every target AWS account:
Roles > Create Role > Common Use case is EC2 > Name it as ‘BaseIAMRole’
Applying the Configurations via Halyard to Spinnaker
Once an IAM user is created with sufficient EC2 permissions and Rosco is configured with a Debian repository, we can safely enable the AWS bakery flags. Run the following commands in Halyard:
Add AWS provider account
export AWS_ACCOUNT_NAME=aw-dev
export ACCOUNT_ID=852713462742export ROLE_NAME=role/SpinManagedAccounthal config provider aws account add ${AWS_ACCOUNT_NAME} \--account-id ${ACCOUNT_ID} \--assume-role ${ROLE_NAME}Optionally, configure the target Availability zone in AWS
hal config provider aws account edit ${AWS_ACCOUNT_NAME} \
--regions us-east-1,us-west-1
Configure AWS provider with Connection credential
#Config the IAM User to connect with AWSexport ACCESS_KEY_ID=xxxxxxxxxxxhal config provider aws edit --access-key-id ${ACCESS_KEY_ID} \--secret-access-keyEnable AWS profile and apply the changes to take effect
#Enable AWS providerhal config provider aws enable#Apply the changes to take effecthal deploy applyAWS Networking Requirements for the Deployment
Prior to performing deployment, you need to configure Subnets and create Security Groups in AWS. Follow the procedure here to get them done.
-
Making Subnets visible to the Spinnaker Deployment
In Spinnaker, multiple subnets are grouped together into one by the above configuration tag to every subnet. The actual subnet value is not displayed on the ResourceGroup page if the purpose text is the same across the Subnets. The Spinnaker subnet value is displayed as <purpose> name.
To make subnets visible to Spinnaker, every subnet needs to have a tag called ‘immutable_metadata’. Syntax
immutable_metadata={"purpose":"<example-purpose>"}Example
immutable_metadata={"purpose":"web-alb"} -
Configuring Security Groups in AWS for Spinnaker Firewall Control
Firewalls in Spinnaker are the equivalent of Security Groups in AWS. You can create a Firewall in Spinnaker UI or in AWS Console but recommended to use AWS. You can set up a minimum of two Security Groups – one of your external Load Balancers and another for your Internal application server group.
If you decide to expose your application to the public users via port 80 and 443, then create a Security Group for ALB (Application Load Balancer) that whitelists Incoming ports 80 and 443. The VPC should be associated with the Spinnaker target VPC.
Setup another one for Application Servers. If the app is running under 8080 port, then create a Security Group for application servers that whitelists incoming ports 8080 and 22 (To connect via SSH for monitoring and debugging purposes).
-
Creating a Load Balancer
Prior to performing deployment, you need to set up a load balancer that will route the traffic to the application servers that will get deployed by the Spinnaker pipeline. Load Balancer setup is done through the Spinnaker UI.
Go to the Infrastructure tab and select Load Balancer. Click on ‘Create Load Balancer’. Fill out the details as directed in the images below:
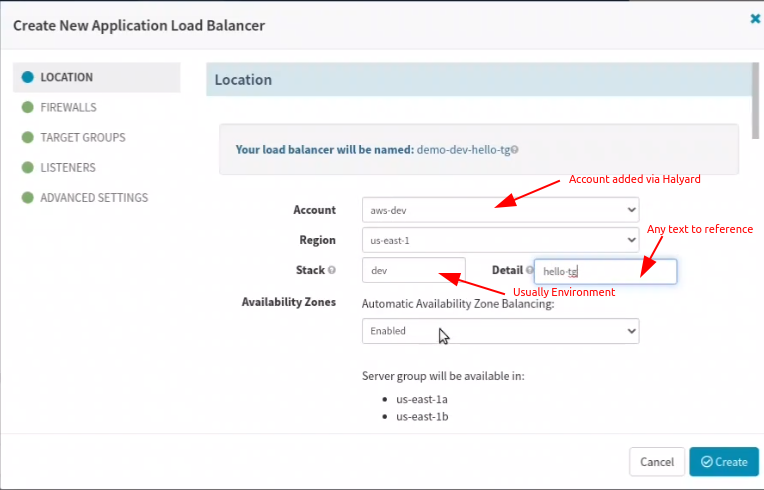
Configure Load Balancer in Spinnaker
Remember Load balancer name is formed using application name + the text from the Stack and Detail fields. So name it nicely to indicate the environment in the Stack or Detail field.
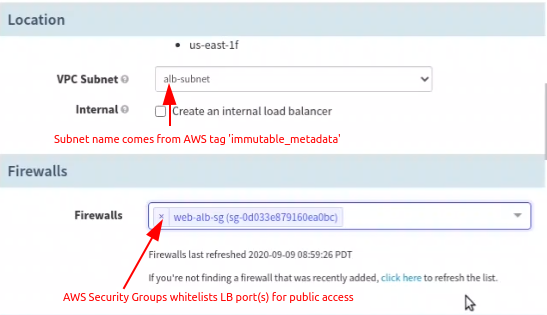
Configure Location and Firewall in Spinnaker
Earlier in AWS Console, you have given a value to the key ‘purpose’ of the JSON input to the tag ‘immutable_metadata’. The purpose texts are listed here as Subnets.
Depending on the Subnet selection, the VPC is chosen implicitly and so the Firewalls here list only the Security Groups of AWS associated with the chosen VPC. Choose the one desired for load balancer (be careful not to select the one intended for application server)
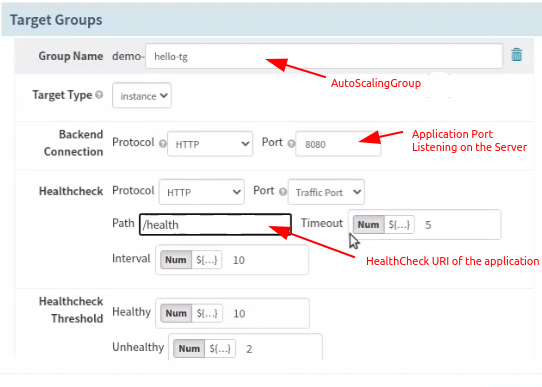
Configure Target Groups in Spinnaker
In (AutoScaling) Group Name, you can choose any input text; Remember, this becomes the prefix to server groups being created in ascending order like v001, v002, etc. Make sure Health check Path is not protected by any authentication and should be accessible anonymously.
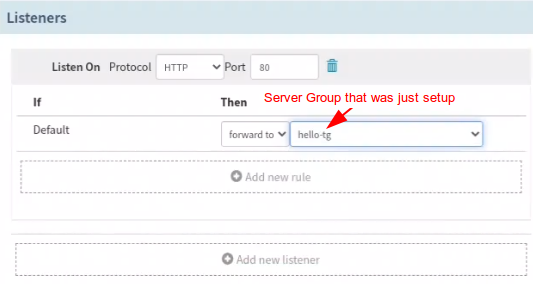
Configure Listeners in Spinnaker
In the Listener section, forward the traffic to the Auto Scaling Group you just setup.
-
Deploying to AWS (EC2) through Spinnaker CD Pipeline
Deploying to AWS refers to the process of creating a server group using a previously baked AMI. The new server group, depending on the deployment strategy, can be configured to receive the traffic from load balancer automatically.
Deploy Stage in Spinnaker
The Deploy stage depends on a successful Bake stage in the Spinnaker pipeline.
Go to the Pipeline and add a stage next to the Bake AMI stage and feed the inputs as shown in the images below:
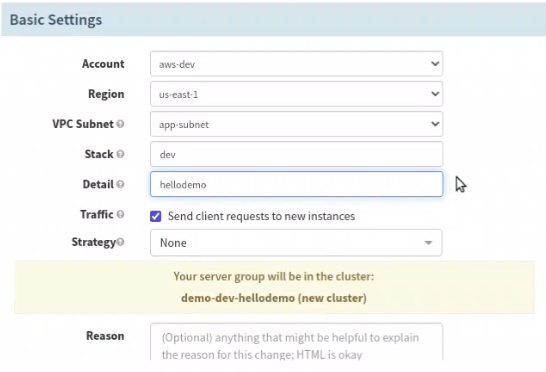
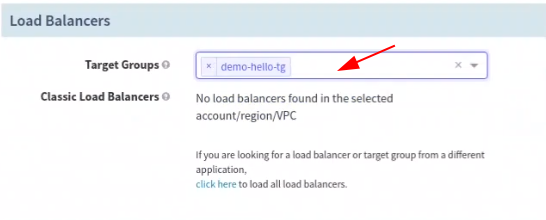

Choose the security-group desired for the Application server (be careful not to select the one intended for load balancer).
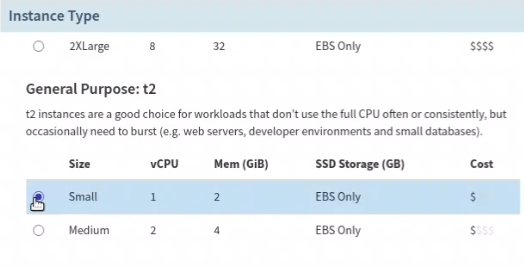
Choose a machine type depending on the resource requirement of the application.
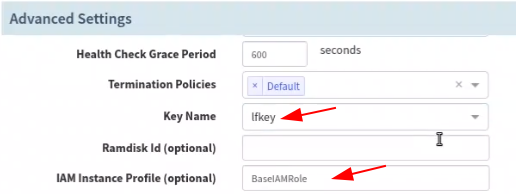
Select a keyfile name here and you must have the private keyfile of the selected one on your machine to connect to the EC2 instances. The IAM Instance profile if left blank will be used as BaseIAMRole, if you have a different one created already, type the value here.
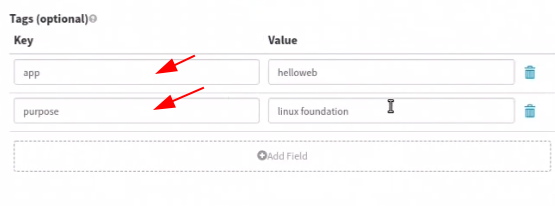
These additional tags are attached to every EC2 machine instantiated by the server group.
After configuring the ‘Deploy’ stage, go back to the Execution page, and trigger a manual deployment. It will take a couple of minutes to bake a new image (or use the existing image if the Jenkins build or the package version is the same) and to complete the deployment.
On completion of the deployment, access the DNS name of the load balancer in a browser to check the application.
Summary
We have explained the procedure to perform a successful deployment using Spinnaker on AWS EC2 using a baked AMI. Go ahead and give it a try yourself. And in case you want to install OpsMx Enterprise for Spinnaker, click here.
More interesting videos:
If you want to know more about the features or request a demonstration, please book a meeting with us.
OpsMx is a leading provider of Continuous Delivery solutions that help enterprises safely deliver software at scale and without any human intervention. We help engineering teams take the risk and manual effort out of releasing innovations at the speed of modern business. For additional information, contact us
