Deploying Helm Chart to Kubernetes using Spinnaker
Spinnaker is a multi-cloud and multi-environment Continuous Deployment tool. One of the target environments is Kubernetes(k8s) to deploy micro-services.
Why deploy Helm Chart on Kubernetes?
Creating multiple manifest files and performing kubectl apply command for every manifest makes it cumbersome. So, something similar to rpm or apt-get as in Linux is required for K8s environment for installing connected release objects. Here comes the savior Helm Chart, which eases the deployment of manifest files into K8s environment.
Visit the official Helm chart page for more details on the Helm Chart.
Helm Deployment to Kubernetes
Helm has two components – Helm CLI and Tiller
- Helm CLI => It is installed on Client Desktops/VMs as a native OS package and is used to create Helm chart and package (.tar.gz).
- Tiller => It is the server-side component and is installed in K8s as a POD, which takes care of installing and querying charts for the CLI.
Helm Chart in Spinnaker
When it comes to using Helm Charts in Spinnaker, we will use Helm CLI for creating a package (.tar.gz); Spinnaker will use the Helm renderer to convert the package into baked manifest files (just like what helm template command does) before deploying. Spinnaker uses kubectl interface to connect with K8s, instead of using the Tiller service. Technically, helm list command will not show anything installed by Spinnaker, because this command populates the releases installed by Tiller.
Why use Helm with Spinnaker, not with Tiller
- Helm does plain vanilla deployment, and rollback to previous versions. It does not provide any advanced deployments like Canary, Blue-Green deployments. On the other hand, Spinnaker is a purpose-built tool for Deployment, encompassing the advanced features of deployments like Blue-Green, Rolling update, and Canary deployment.
- Helm install command plainly instructs the Tiller to deploy the package. It does not report back if the deployment was failed or succeeded. However, Spinnaker has the ability to continuously track the status of Deployment and report back the success/failure result. The Spinnaker dashboard also gives information about the deployment like replicas, service, and infrastructure.
- Spinnaker provides the visibility into DevOps pipeline. This pipeline gives the ability to provide manual approvals to promote a package to production after testing/staging. The stakeholders of the organization get the visibility of the entire deployment in Spinnaker across multiple environments like dev, QA, staging, and prod, while easily applying the configs required for each environment.
Deploying Helm Package to Kubernetes with Spinnaker
The procedure to deploy helm chart into K8s involves series of steps including app’s docker image build, creating helm package, publishing the helm package to a binary store and then using the helm package in the Spinnaker pipeline.
In this article, we will just focus on baking the helm package from a binary store (GitHub) and using the baked manifest files for deployment into K8s.
We assume that you know how Helm charts work, comfortable with creating Helm chart package and publishing to any binary repository.
Assumptions:
- Target K8s deployment environment is configured in Spinnaker.
- Spinnaker is enabled to fetch artifacts from GitHub account.
- We will use GitHub repository as Helm Chart store. The Chart package .tar.gz is committed into the Git repo. The repo also contains the chart’s override value.yaml files for different environments.
Using Helm Chart in Spinnaker Pipeline running on Kubernetes
In the Spinnaker pipeline, the Helm chart deployment is done with three essential stages – Configuration, Baking, and Deployment.
- Essentially you need to define all the artifacts (including override files if there are any) that are required to be fetched in the Bake stage. These artifacts definition is done in the Configuration stage.
- Next, you will define a Bake stage for baking the Helm chart. If you are targeting multiple environments, then you would define a separate bake stage for every environment; In every bake stage, you need to reference the common template artifact but with a different override file, which was defined in the configuration stage. The bake stage will produce a base64 kind artifact which will contain the hydrated K8s manifest files.
- In the Deployment stage, you will use the base64 artifact produced in the Bake stage, to deploy into a K8s environment. Like in the Bake stage, if you intend to deploy on multiple environments, then you need to create a separate Deploy stage for every environment.
With this Spinnaker pipeline, our aim is to deploy a Helm chart (.tar.gz) in a GitHub repository into a K8s cluster environment. The procedure to set up the pipeline stages is explained below.
Note: You need to create a Pipeline with a suitable name in order to set up the pipeline stages.
Step 1: Configuration Stage
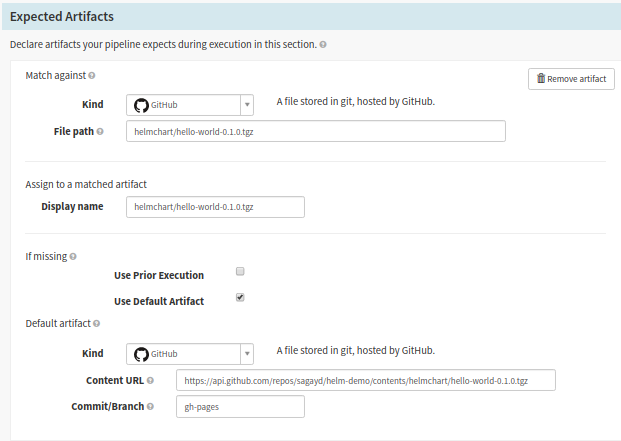
a. Input parameters needed for the various Spinnaker pipeline stages are defined in the Configurations stage. You need to define the helm chart artifact (and any override file if any) to be deployed into our K8s environment. Go to the pipeline configuration and click on the Configuration stage. The artifacts defined in the ‘Expected Artifacts‘ section will be used in the Bake stage as input. The section ‘Match against‘ matches the artifacts from the Automated Trigger GitHub configuration and the ‘If missing’ section defines the default artifact. The default artifact is used when you perform a manual pipeline execution.

Configure the expected artifacts or input parameters for various Spinnaker pipeline stages
Expected Artifacts Form Fields:
- Kind: It should be GitHub, as our chart is hosted in GitHub repo.
- File Path: The artifact here is matched against the GitHub commit trigger. Just mention the file path after the repository name. You should configure the GitHub repository info under the ‘Automated Trigger‘ area. For example, if the file resides in the URL https://github.com/sagayd/helm-demo/blob/gh-pages/helmchart/hello-world-0.1.0.tgz, the value will be ‘helmchart/hello-world-0.1.0.tgz’
- Display Name: You can give any name – choose a name you can easily reference the artifact in later pipeline stages. For simplicity, you can maintain the same name as the file path like helmchart/hello-world-0.1.0.tgz
- Use Default Artifact: Ensure to select this field. This is mandatory to perform manual triggers. Otherwise, the pipeline will fail before even performing any action in the pipeline execution.
- Under ‘Default Artifact’ section, Kind should be GitHub, Content URL should be the complete GitHub API path of the file, and Commit/Branch should capture your Git branch where the file resides.
In my case, the Content URL was https://api.github.com/repos/sagayd/helm-demo/ contents/ helmchart/ hello-world-0.1.0.tgz, and Commit/Branch was gh-pages. Pay attention to the api url, which is different from the actual http url of the GitHub. For example, the http url https://github.com/sagayd/helm-demo/blob/gh-pages/helmchart/hello-world-0.1.0.tgz will be transformed to api url https://api.github.com/repos/sagayd/helm-demo/contents/helmchart/hello-world-0.1.0.tgz?ref=gh-pages. Ensure to test the api url (including the ?ref=branch suffix) on a browser and is returning the json information of the file successfully. While mentioning the Content URL value, exclude the ‘?ref=branch’ part. On the api url above, sagayd is the repository-owner, helm-demo is the name of the repository and gh-pages is the branch.
Note: If you give any URL or file path instead of a working json API path, then you will get error in fetching the artifact like ‘Unexpected character (‘<‘ (code 60))‘
Override values.yaml file
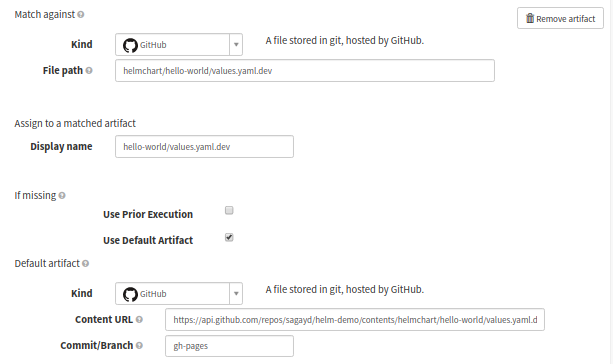
Optionally, you can override the values.yaml file of the helm chart with a different one. This will be required when you are targeting the chart deployment to different environments like dev, QA, staging, and production, to have different values in the K8s manifest files. For example, the namespace for every environment could be different, similarly, the K8s pod replica-set is a relatively lower number for dev, QA, and staging when compared with production. In such cases, you will need to override the values.yaml file of the helm chart package.

Spinnaker pipeline configuration stage: Overriding values.yaml file
In the picture above, we are targeting the override values.yaml file for dev environment which is available at https://github.com/sagayd/helm-demo/blob/gh-pages/helmchart/hello-world/values.yaml.dev.
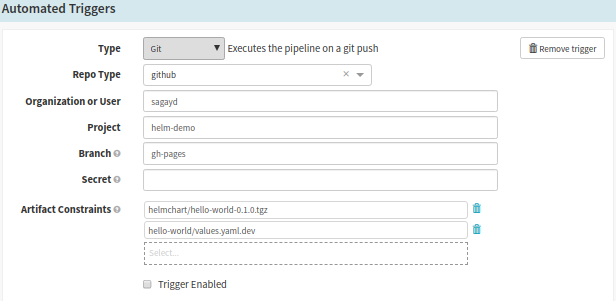
b. The ‘Automated Trigger’ section should be defined with GitHub account and repo details. The artifacts defined in ‘Expected Artifact > Match against‘ use this configuration to match artifacts when Git commit is triggered. Here is the example configuration of our repo.

Spinnaker Pipeline Configuration: Configure Automated Triggers
- Type should be Git,
- Repo Type should be GitHub,
- Organisation User should be the repository owner,
- Project should be the repo name and
- Branch should be the branch containing the artifact. Here, Artifact Constraints refers that artifacts defined in the ‘Expected Artifact’ area, rely on this GitHub configuration. You can select your artifacts to use this particular GitHub repository to match files.
Step 2: Bake Stage
Note: This is the actual stage that Spinnaker uses Helm renderer to bake package into manifest files (generate manifest files by replacing the variables with values). It is the equivalent of what helm template command does on a console terminal.
a. Template Artifact
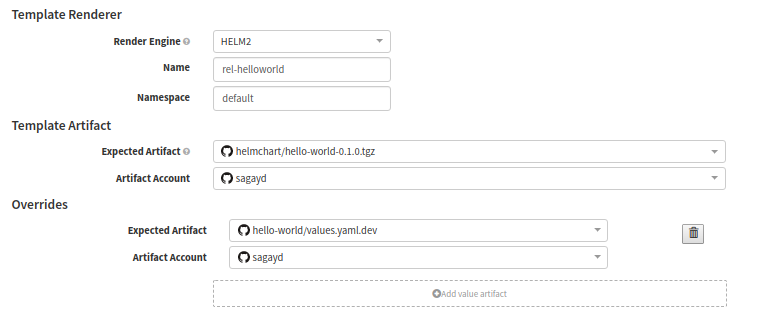
The key to successful baking stage execution depends on the correctly configured input artifacts (i.e Expected Artifact). You just select the artifacts here which were defined in the previous ‘Configuration Stage’

Spinnaker pipeline configuration: Template Artifact
- Renderer Engine: Ensure to select as Helm2.
- Name: This field here actually refers to the release-name of K8s deployment.
- Namespace: It is the target K8s namespace to deploy the release into.
- Expected Artifact: Select the chart (as per Display name in Configuration stage’s Expected Artifact). In our case, our Display Name is ‘helmchart/hello-world-0.1.0.tgz’; It is listed as one of the drop-down values and we choose it.
- Artifact Account: GitHub account to pull the artifact from. My demo account was sagayd.
Now to override the values.yaml file, click on ‘Add value artifact’ and select the appropriate environment override file under ‘Expected Artifact‘. For our example, we just select values.yaml.dev file as this is meant for dev environment.
b. Produces Artifact
During the baking process, the Spinnaker will generate baked manifest files and the result is saved as base64 kind. The base64 resultant artifacts encompass the K8s manifest files that are ready to deploy into a K8s environment. We will configure this artifact in the ‘Produces Artifacts’ section to deploy.

Spinnaker pipeline configuration: Produces Artifact
- Kind: It should be
base64for baked manifests. - Name: It is the release name, and is the same as what is defined in the Expected Artifact area.
- Display Name: It can be any of your choice, and will be referenced in the Deploy stage.
Step 3: Deploy Stage
Note: In this stage Spinnaker uses the base64 file (contains manifest files) generated by the Bake Stage. We need to configure the target K8s environment to deploy the manifests.

Deployment (Manifest) configuration in Spinnaker pipeline
Form fields under Basic settings:
- Account: Choose the target K8s account to deploy.
Form fields under Manifest Configuration,
- Manifest Artifact: Choose the base64 kind artifact that you configured in the previous Bake stage. The display name of the artifact from the Bake stage will be listed here, just choose yours.
Execute Pipeline
Configuring of Pipeline is now completed. You can go ahead and execute your pipeline and confirm if everything goes well. If you encounter any issues, you can get in touch with the OpsMx Support team.
If you want to know more about the Spinnaker or request a demonstration, please book a meeting with us.
OpsMx is a leading provider of Continuous Delivery solutions that help enterprises safely deliver software at scale and without any human intervention. We help engineering teams take the risk and manual effort out of releasing innovations at the speed of modern business. For additional information, contact us
