How to bake and troubleshoot Helm Charts in Spinnaker?
What is Helm and Helm Charts ?
Baking Helm Charts in Spinnaker
Pre-requirements for baking
- Spinnaker 1.19.0 or higher version
- A working Helm repository with Helm 3 charts
- Override values.yaml file on a GitHub repository
How does it work?
Procedure Outline
- Add Artifact accounts – Helm and GitHub
- Configure Input Artifacts for the Bake stage
- Setup Baking stage to produce rendered manifest files (base64 type)
- Setup Deployment stage using Baked manifest files
- Verify if the application is deployed successfully
We explain steps 1 to 3 in this guide, while 4 and 5 left to the users to perform as it can be done just like any other K8s deployment, with the only difference being to use the baked manifest files produced in step 3.
1. Add Artifact accounts – Helm and GitHub
With the help of halyard let us enable helm type of artifacts, and add a helm account. The helm account in halyard points to a Helm repository and is accessible by the Halyard, Rosco, and Clouddriver services. Helm repository is simply a web directory containing the <helm-charts> .tgz files or .tar.gz files of whose meta information is recorded in an index.yaml file present in the root of the helm repository.
#Run these commands inside Halyard
hal config features edit --artifacts true

hal config artifact helm account add stable-helm-ac --repository https://kubernetes-charts.storage.googleapis.com
#Note: No trailing slash in the URL

#Add any private Helm repository
hal config artifact helm account add saga-helm-ac --repository http://52.252.54.0
hal config artifact helm enable

hal deploy apply
Optionally, if you like to override the values.yaml file from a GitHub repository, you can configure halyard with your GitHub account as below.
#Access tokens require repo scope for private repos and public_repo scope for public repos
hal config artifact github account add saga-github-ac --token xxxxxxxxxxxxxxxyyyyyyyyyyyyyyyyyyyyyzzzzzzzzzz
Aftert these steps, the newly added account(s) should be visible to configure Expected Artifacts in Spinnaker UI. Give it some time to refesh the accounts in the UI.
2. Configure Input Artifacts fetch-able from Helm Repository
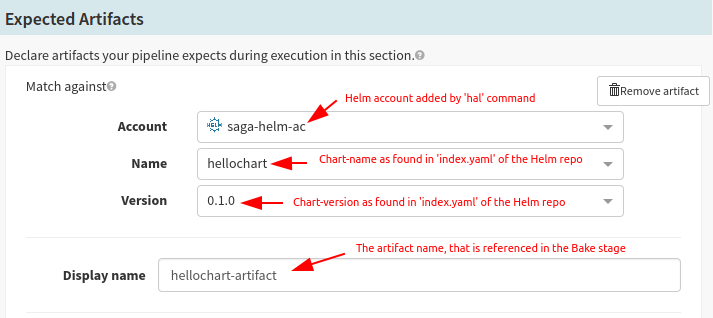
Configure Input Artifacts fetch-able from Helm Repository
In Spinnaker UI, select the application and choose your pipeline and go to its Configuration stage. Now you should see the account you have added in the previous step. Select the account, chart name, and version.
apiVersion: v1
entries:
  hellochart:
  - apiVersion: v2
    appVersion: v1.0.0-helm3demo-1
    created: "2020-03-22T03:51:19.498042129Z"
    description: A Helm chart for Kubernetes
    digest: 90467716ee0c0338dd2cab1481f293535b878bf31704624922cdc040820cc939
    name: hellochart
    type: application
    urls:
    - http://172.42.42.113/charts/hellochart-0.1.0.tgz
    version: 0.1.0
generated: "2020-03-22T03:51:19.497596204Z"
In case of values.yaml file overriding, you can set up another Expected Artifact as seen below; otherwise, it is not required.
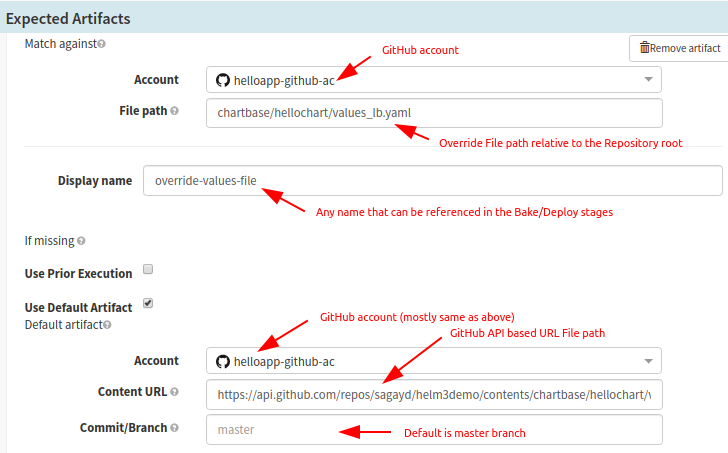
Configure Input Artifacts fetch-able from Helm Repository in Spinnaker.(contd.)
3. Setup Baking Stage to produce rendered manifest files
Once you have configured all of your possible input artifacts (which would be used in Bake/Deploy stages usually), you are good to configure Baking stage. After adding a Baking stage type, you can configure the inputs as seen in the screenshot below. If overriding of values.yaml is not required, you can skip that step.
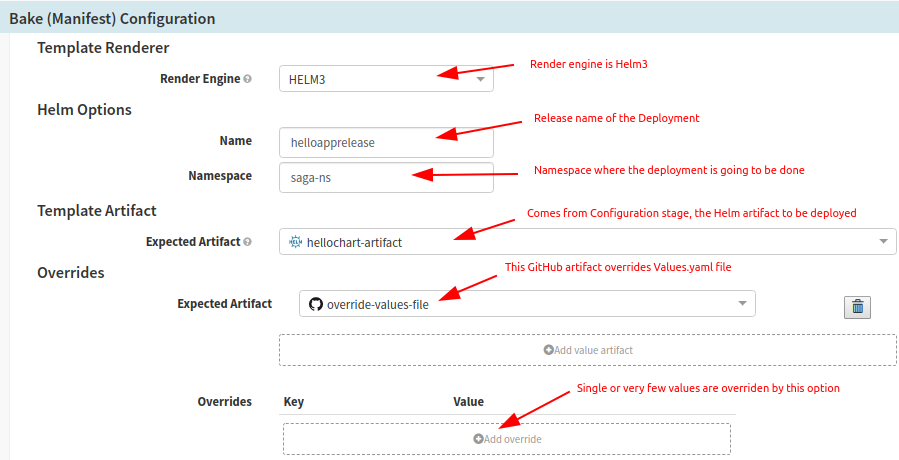
Setup Baking Stage to produce rendered manifest files
You would also need to configure the output of the Bake step. Once the manifest files are rendered, they are configured to produce Base64 type artifact as shown below.
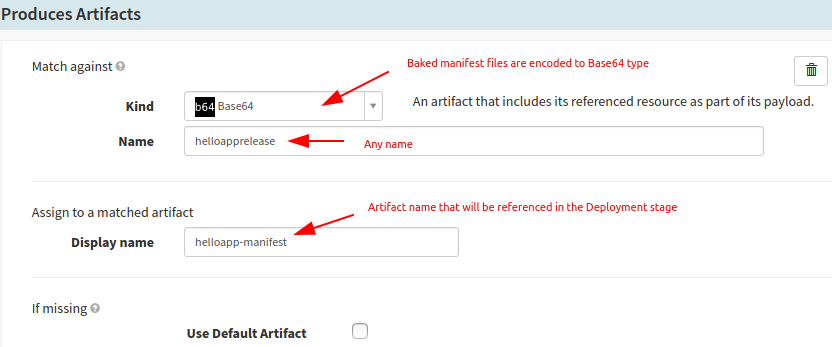
Setup Baking Stage in Spinnaker to produce rendered Helm Chart 3 manifest files
Troubleshooting Helm Charts
Problem:
I have added the Helm repository, but it is not displayed in the Spinnaker pipeline configuration.
Solution:
hal config artifact helm enable and hal deploy apply again.Problem:

Solution:
hal config artifact helm account add stable-helm-ac --repository https://kubernetes-charts.storage.googleapis.com – Correct one. hal config artifact helm account add stable-helm-ac --repository https://kubernetes-charts.storage.googleapis.com/ – Error (Busy loading the charts)
Problem:
Artifact is not fetched or throws 404 File not found error for GitHub artifact.
Solution:
- Make sure the GitHub token is correct
- Make sure the token is given repo scope (GitHub Profile > Settings > Developer Settings > Personal access tokens > Select the token and the list of scopes are listed. Make sure to select ‘repo’ scope)
- Run the command
curl https://api.github.com/repos/sagayd/helm3demo/contents/chartbase/hellochart/values_lb.yaml \ -u nobody:xxxxxTOKENyyyyyyy. If you are able to see the meta-data, it means that the token is correct. Just re-verify and apply the changes on the halyard.
So in this article, we have shown you how to the steps to implement the Helm 3 template baking (i.e. rendering), so that the final manifest files will be available for performing deployment into the Kubernetes (K8s) cluster. If you wish to streamline your Continuous Delivery, please read the following articles:
OpsMx is a leading provider of Continuous Delivery solutions that help enterprises safely deliver software at scale and without any human intervention. We help engineering teams take the risk and manual effort out of releasing innovations at the speed of modern business. For additional information, contact us
